I’ve been asked a number of questions regarding my RAW file workflow, and it seems prudent to post that information here, if I can retain your attention long enough for a quick summary of this techy, but necessary language in today’s world of digital art. Due to the young “state of digital affairs” and software development (or lack thereof), my workflow has changed frequently but is stabilizing somewhat with the help of Adobe Photoshop Lightroom. Some have asked “Which is better, Photoshop, or Lightroom?” They are different programs, that serve different purposes. It is not a “one” or the “other” situation. I use them both.
Lightroom was designed specifically for a RAW image workflow, with a database functionality, its a young program and will continue to mature. When you shift to a database program to manage your pictures, there are lots of sorting and organizational options available, and its time to leave the world of many, many, many folders–as a means of organizing–behind. This is called “Folder Emancipation”.
There are web sites and books dedicated to this subject, so my humble little two cents summarized here is what works for me, please consider a broad range of options…
And, so as not to be presumptuous, I shoot in RAW only.
1) Folder Structure:
I use a simple folder naming protocol based on: Year/FolderNumber/MM/Location. All of my images go into one main folder called “IMAGES”, with subfolders by year, unique 3 digit folder number prefix, month and specific shoot description. My recent Antarctica trip folder structure looks like this:
D:IMAGES/2010/247-01-falklands
D:IMAGES/2010/248-01-south-georgia
D:IMAGES/2010/249-01-antarctica
2) File Naming:
I do not rename photos from my Canon 1Ds III cameras, since I prefer to use the in-camera file naming option which generates an 8 digit number. The 5D Mark II creates an annoying and worthless prefix “IMG_” which I use Lightroom to change into a meaningful set of characters for me, but retain the following four digit suffix. You can sort by many methods in Lightroom, but make sure to sync your camera date/time so you can sort by capture time if ever necessary.
O.K., I just lied. For my photography work in other countries, I do add a three character IPTC standard country prefix. Antarctica is ATA, etc. So the file looks like: ata-21015432.
3) Editing:
Editing to me means keep or throw away. I use color coding in Lightroom because I find that easiest–there are many ways to do this. One color for delete, one color for keep, and no color means that it won’t get my grading attention and is moved to a external hard drive dedicated for “outtakes” (hard drives are cheap today. It is there for posterity mostly, but on a rare occasion I’ve gone back into this drive to resurrect something). The actual delete process is done at the very end of the editing process by selecting that specific color and then deleting.
are you bored yet?
4) The Grading / Developing / Processing:
Those are three synonyms to me by the way. Call it what you wish. 90+ percent of my files remain as RAW files and are not converted into tiffs, psd’s or jpgs. In the not so recent “old” days, I needed to make a tiff to apply even the simplest sky control or local adjustment with a layer adjustment in Photoshop. Man, am I glad those days of wasted time are over! Lightroom can handle most grading requirements, although I still need to generate a tiff for special circumstances like exposure blends, panorama stitches, flare control blends, perspective control, barrel distortion, etc., (although I’m hoping some of these abilities will make their way into future versions of Lightroom). When I have completed the grading process on all images, I use Lightroom to convert them to DNG’s (an adobe standardized RAW file), which embeds all of the .xmp information and gets rid of the side car file. I do this at the end since it takes some processing power and time, although not unreasonable, but I’m therefore not converting files that would eventually be deleted anyway. Plus, it updates the embedded .jpg preview at this time, a step necessary if sharing digital RAW files with other programs.
5) Master Files:
When a RAW file needs Photoshop’s attention, the generated .tiff or .psd gets the same file name as the original RAW file, and is stored in the same folder. This way, all files sit next to each other in one location. You can then use Lightroom’s “Grouping” or “Stacking” feature to lump them all together and not clutter your view. Groups can be expanded or collapsed with one key stroke. These are handy features of an image database, which if you are not now doing, you should be.
6) Virtual Copies:
If you want to make a special variation of a particular RAW file, lets say for example, print it as a black and white, give it a special crop, desaturate it, etc., Lightroom offers “Virtual Copies” as a great alternative to making additional files. They exist as “virtual”, but not “actual” duplicates of the original, and therefore, do not take up hard drive space. You can then print from within Lightroom, or choose the file and select open in Photoshop if it is your favored printing environment.
Hey, who wants to read a long blog entry.
I could go on and on, but this is a short summary of my workflow. There are some excellent Blogs out there dedicated to Lightroom. At this point in time for me, Lightroom blends speed, organization, and functionality all in one. It really is like being an artist in a dark room, but no chemicals, and you can leave the lights on. Art is now happening in a way fitting for one who generates a lot of digital files. Aperture’s recent release includes local adjustment capability also, and I presume, this whole workflow things is going to get better and better. Have fun making art with your pictures.
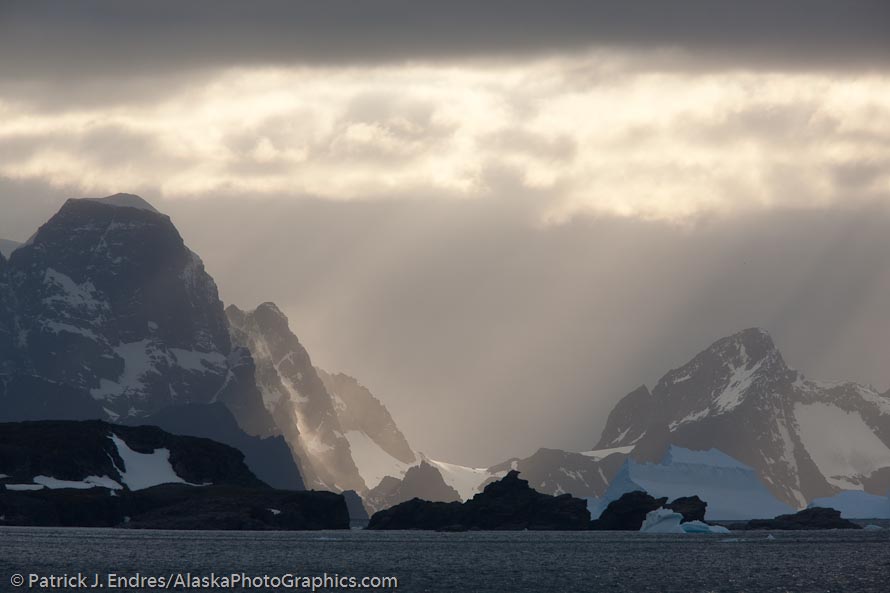
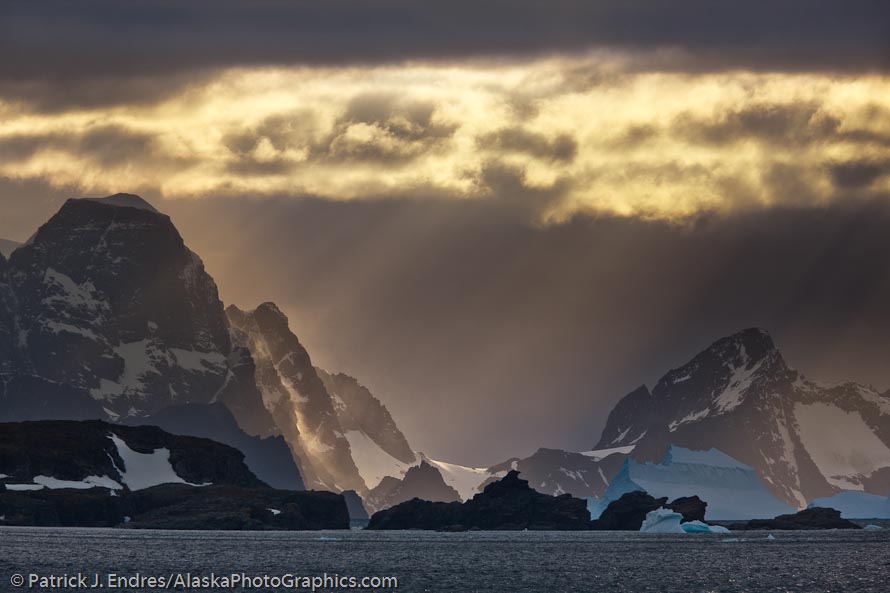
And speaking of fun, here is a shot I recently used in a book I made on Antarctica. The before and after Lightroom, using the .DNG raw file, with pretty basic adjustments.
In the next post, I’ll share another photo from Antarctica that has a little more artistic work done on it in Lightroom.

Before Lightroom

After Lightroom
Lightroom adjustments include:
- Brightness: +14
- Fill Light: 43
- Blacks: 11
- Contrast: +97
- Color Temperature: warmed from 4700 to 5484
- Graduated filter: 2 Grads
- Localized brush: 3 Brushes
- Red chromatic aberation: +22
- No saturation
- No Vibrance


