In the previous post I briefly discussed the general workspace and method I use to edit a folder of images in Lightroom. I began with 3,700 pictures from a shoot in Denali park, and after my first round of edits, followed by a second pass, I narrowed it down to 368 keepers. That’s about 10%, but this final number will vary greatly in relation to the type of subjects photographed. Wildlife and motion imagery often generates more frames, compared to landscape work. Additionally, what is chosen as a keeper will be based on the destination purpose, i.e., prints, stock, wedding, etc.
So what to do next with these 368 photos? Not to sound too much like a broken record, but one really needs to think this process through to the end product, so the necessary amount of work is done appropriately to the RAW file. What is not done can be as important as what is done, since a lot of time can be spent working on images.
If at all possible, I greatly avoid the need to generate a tiff. First of all, this is possible because of LR’s excellent development processes, and secondly, the algorithms and processing options for a RAW file are continually being updated. To employ them at a later time, one needs to then start over with the RAW file if a tiff has been made. All of that to say that you should do all you can in LR before making the final judgment on whether or not to make a tiff. And knowing LR can in the end save you time.
Since my website sales portal will be offering instant purchase, the pictures must be clean and well processed to meet professional standards for fine art prints and stock imagery. And, this needs to be done ahead of time now, and not just at the point of sale. So the following represents my successive workflow.
Set up your view options in both Grid and Loupe View
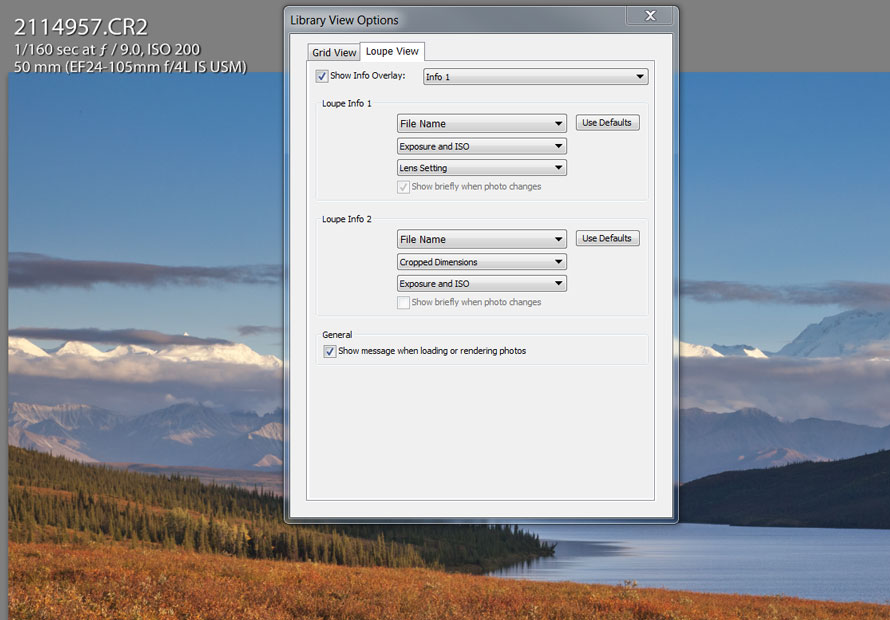
This probably belongs in the previous post, but if you have not done it yet, now is a good time: Click “Ctrl J” to open the view options dialog box. You have two environments in which to control what sort of badges and information is displayed on the image. I recommend making the compact cells and expanded cells to show different information on the thumbnails and you can toggle between these views by hitting the “J” key when in grid mode. The same can be done for the two “info” options in loupe view. You can toggle between them by hitting the “I” key. I like to set up my loupe info to include exposure/ISO/lens settings. But you can play around to see what best suits your inquiring mind.

Set view options by clicking "Ctrl J"
Spot Removal: “Q” shortcut key
Sorry to start with this annoying task. If you are not preparing files for print or press reproduction, skip this one!
This is done as a first pass on the entire folder. It is done first because it seems that using the spot removal tool in LR can be somewhat slowed down if there is an abundance of other brush and filter applications applied first. This is a hideously tedious job and unfortunately, the synchronization of spot removal from one image to another is seldom effective due to variations in the sky such as clouds, etc. Sometimes it works, but not often in my experience. Removing spots will encourage you to keep your sensor clean. If you own a Canon 5D Mark II, you might consider this dust shield option.
A time saving tip when using the spot removal tool: Size the brush properly by using the wheel on your mouse, (I almost always use the “heal” option) then click on the spot and drag the brush to a proper location in one motion. If you just click on the spot and release, LR will automatically select an adjacent area to sample from. But, I’ve found its not that smart in the choice process.
If you’re end goal is to make a web-presentable image only, I would not employ spot removal unless there are distracting and noticeable spots on a photo.
GLOBAL CHANGES
Step #1: Upgrade to the New LR3 Process
(This only needs to be done on older images imported with LR Version 2) You will see a little exclamation point in the bottom right when you go the development tab on a photo. Click that to upgrade, and select upgrade all images.
Step #2: Apply “Lens Corrections” to the entire folder.
(make sure your LR version is up to date with the latest lens profiles. While the lens profile list is not comprehensive, it is continually being updated)
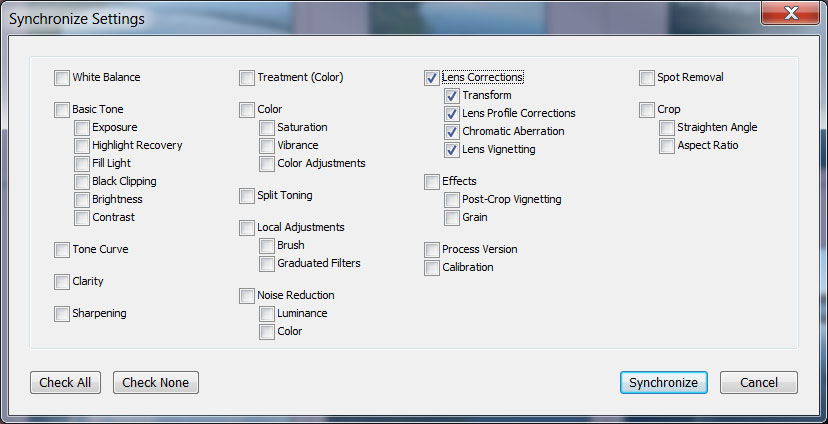
This will take care of vignetting, chromatic aberration, and optical distortion. Select an image, go to develop mode, click the Enable Profile Corrections box. Then with that image selected in the grid mode, select the rest of the images and Synchronize settings. When the dialogue box comes up, click the check none button, and then only check the box for syncing the Lens Corrections. Then click Synchronize and you are done.

Check only the "Lens Corrections" box
You will learn if any of your lenses require any additional vignette control subsequent to the auto feature. If this is necessary, you can search for all images taken with that lens via the meta data search option in the “Library filter”, and select/apply that corrective setting to one image and then syncing it to all the others. You can activate this filter by going to View/Show Filter Bar, if it is not already visible. Then select Metadata, then in the Lens column, pick the proper lens (make sure all images are selected before filtering). For example, I find that the Canon 24-105 lens profile needs a slight decrease in the amount of vignetting applied by the profile, so I pull it down in the Vignetting slider below the Make/Model/Profile.
Step #3: Apply Noise reduction as necessary per ISO
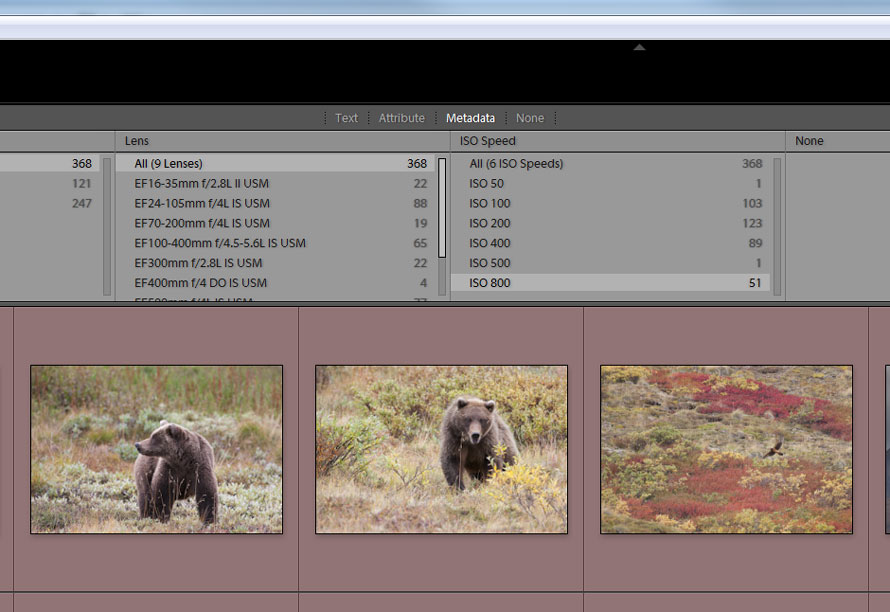
If you know that there was a series of images shot at a high ISO that may be candidates for a greater degree of noise reduction, you can select these by using the Library filter in the same fashion as mentioned above. Click Metadata, then mouse over one of the columns and on the right side you will see a little list icon. Click on that and select add column. Once the column is added click on the word “None” and a drop down menu will appear allowing you to select a number of fields. Select ISO and you will then be able to select all images taken per specific ISO. Select those images and apply your “noise reduction” as necessary. I often apply a little more NR to photos that I shoot at 800 or 1000 ISO, and on images that will receive a large amount of shadow recovery (or fill). In the example below, I shot 51 images at 800 ISO.

Use the Library Filter to create a custom column for specific metadata
Following these global settings that can be batch applied, it is time to go into each image individually and begin the process of what I call grading, or processing but I do not call it editing. Editing in my terminology refers to the decision to keep or delete an image. There are a number of presets that can be purchased which include variations of customized settings in the develop module. Some people find these useful, but I have chosen to work through the various grading attributes in the develop module individually as it best suits my preference.


